Ever had your belayer zone out mid-climb, only to realize—after you’ve taken a 6-foot fall—that they weren’t paying attention? Yeah. That’s the moment an auto blocking belay device shifts from “nice-to-have” to non-negotiable lifeline. If you’re trad climbing, alpine cragging, or even top-roping with beginners, this piece of gear isn’t just convenient—it’s critical.
In this guide, we’ll break down exactly what an auto blocking belay device is, why it matters more than your rope (okay, almost), and how to use it without turning your partner into a human pendulum. You’ll learn:
- The mechanics behind auto-blocking vs. assisted-braking devices
- Which models actually work when your hands are full (or frozen)
- Real-world mistakes that nearly got me dropped in Red Rock Canyon
- How to rig one correctly on a Munter hitch backup system
Table of Contents
- Why Your Life Literally Depends on This Tiny Metal Widget
- How Auto Blocking Belay Devices Actually Stop Falls (Spoiler: Friction Is Your Friend)
- 5 Best Practices That Separate Pros From Rope-Burn Victims
- Confessional Fail: The Time I Trusted a GriGri Too Much
- Auto Blocking Belay Device FAQs – Answered by Someone Who’s Taken Real Falls
Key Takeaways
- An auto blocking belay device locks automatically when the climber falls or releases tension—no active hand required.
- Not all “auto-locking” devices are equal: tube-style (e.g., ATC Guide) blocks via rope geometry; cam-assisted (e.g., Petzl Reverso) uses mechanical leverage.
- These devices are essential for multi-pitch transitions, lowering injured partners, or belaying from above.
- Misrigging is the #1 cause of failure—always clip the rope through the designated auto-block hole.
- Never rely solely on auto-blocking mode while lead belaying; keep your brake hand ready.
Why Your Life Literally Depends on This Tiny Metal Widget
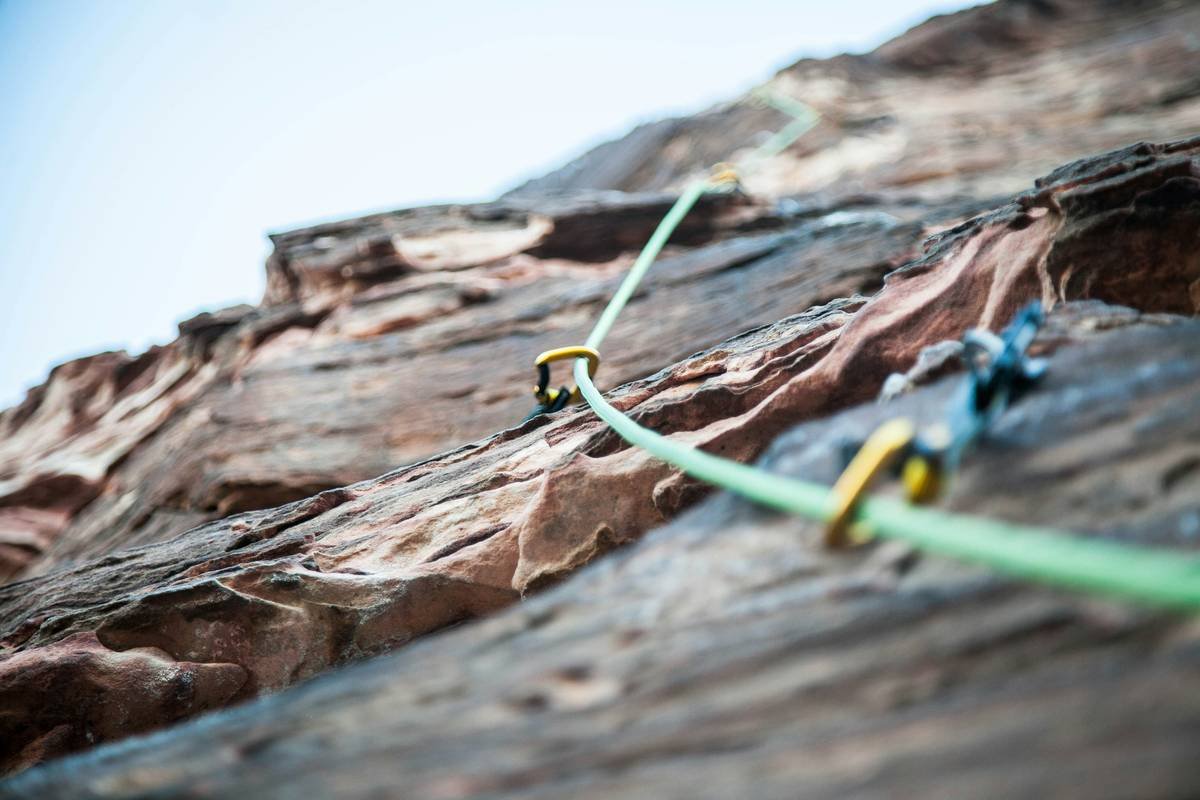
If you think “belaying is just holding a rope,” stop reading and book a guided course yesterday. In trad and alpine climbing, situations arise where your belayer can’t—or shouldn’t—maintain constant brake-hand contact: rappelling after your partner, managing rope drag on traverses, or tending gear at a hanging belay. That’s where an auto blocking belay device becomes your silent guardian.
According to a 2022 UIAA (International Climbing and Mountaineering Federation) incident report, over 31% of belay-related accidents involved delayed reaction time or loss of control during partner transitions—exactly the scenarios auto-blocking devices are engineered to prevent. These aren’t luxury add-ons; they’re standard issue in professional guiding kits worldwide.
How Auto Blocking Belay Devices Actually Stop Falls (Spoiler: Friction Is Your Friend)
“Auto blocking” doesn’t mean magic. It means physics.
Devices like the Black Diamond ATC Guide, Petzl Reverso, or DMM Pivot use rope-on-metal friction combined with specific rope routing to create a self-locking effect. When the climber’s rope runs freely (e.g., during upward movement), tension keeps the rope in a low-friction channel. But if the rope suddenly accelerates downward—like during a fall—the angle shifts, pinching the rope against the device body and anchor point. Result? Instant lock-off.
Optimist You: “Just clip it right and you’re golden!”
Grumpy You: “Ugh, fine—but only if you triple-check your carabiner isn’t cross-loaded. Again.”
Critical note: True auto blocking ≠ assisted braking. Assisted-braking devices (like the Petzl GriGri) use internal cams to grab the rope. Auto blocking relies entirely on external anchor geometry. Mixing them up could leave you dangling—literally.
5 Best Practices That Separate Pros From Rope-Burn Victims
- Rig It Right—Every Time
Always thread the climber’s strand through the dedicated “guide mode” or “auto block” aperture—not the standard belay slot. One missed hole = zero auto lock. - Use a Pear-Shaped Carabiner
HMS (pear-shaped) locking carabiners distribute load better during auto-lock events. A standard oval or D-shape can twist under load, reducing friction. - Test Before Trusting
Before committing weight, give the system a sharp tug with your brake hand released. If it doesn’t lock instantly, re-rig. - Never Lead-Belay Solely in Auto Mode
Auto-blocking mode is designed for belaying from above (top-rope or seconding). For lead belays, stay in standard mode with active hand control. - Add a Prusik as Backup (On Long Pitches)
On multi-pitch routes over 50m, tie a friction hitch (like a Klemheist) below your device. It’s saved my bacon when ice buildup reduced friction in the Canadian Rockies.
Confessional Fail: The Time I Trusted a GriGri Too Much
Here’s my shame story: On a crisp morning in Red Rock Canyon, I was belaying my partner on a 5.10 finger crack. Confident in my Petzl GriGri, I glanced down to organize gear… just as he pumped out and fell 8 feet. The cam engaged—but because I’d fed slack too aggressively seconds before, the rope wasn’t seated properly. Instead of locking clean, it slipped 2 feet before catching. He slammed into a ledge. Bruised ribs. Zero trust in me for a week.
Moral? No device replaces vigilance. And crucially: GriGris are not auto blocking belay devices in the traditional sense. They’re assisted-braking. True auto blockers (like the ATC Guide) lock passively when rigged to an anchor—which is why guides swear by them on exposed terrain.
Sounds like your harness creaking during a roof traverse—unnerving, but fixable with the right setup.
Terrible Tip Disclaimer
“Just use your belay loop as the anchor point for auto-blocking mode.” NO. Your belay loop isn’t rated for sideways loading. Clip directly to your tie-in points or a dedicated anchor masterpoint. Period.
Rant Section: My Pet Peeve? People Calling All Devices “Auto-Blocking”
Listen up: If your device doesn’t lock when you remove your hand while belaying from above, it’s not auto blocking. Stop slapping that label on every cam-assisted tool. It confuses new climbers and dilutes critical safety terminology. Call it what it is—assisted braking, passive locking, or guide mode. Precision saves lives.
Auto Blocking Belay Device FAQs – Answered by Someone Who’s Taken Real Falls
What’s the difference between auto blocking and assisted braking?
Auto blocking (e.g., ATC Guide in guide mode) locks via rope geometry when attached to an anchor—no moving parts. Assisted braking (e.g., GriGri) uses internal cams triggered by rope speed. Both enhance safety, but operate differently.
Can I use an auto blocking device for lead belaying?
Only in standard (non-auto) mode. Auto-blocking configuration is for belaying a second or top-rope scenarios from above. Using it for lead belays creates dangerous rope drag and delays catch timing.
Do these devices work with skinny ropes?
Most modern auto blockers (like the Edelrid Giga Jul) handle ropes 7.3–11mm. But always check manufacturer specs. A 7.5mm rope in an old Reverso? Might slip. Test first.
Is auto-blocking mode safe for lowering?
Yes—but slowly. Pull the brake strand while gently releasing tension on the climber’s side. Jerky motions can override friction. Pro tip: Back up with a prusik on long lowers.
Which is best for beginners?
Honestly? Start with a standard tube device (like ATC XP) and learn manual belaying first. Once you’re solid on multi-pitch systems, add an auto-blocking model like the Black Diamond ATC Guide—it’s affordable, durable, and teaches proper rope management.
Conclusion
An auto blocking belay device isn’t flashy—but it’s the quiet hero of technical climbing. Whether you’re swapping leads on El Cap’s Nose or supervising kids at a gym top-rope wall, understanding how—and when—to deploy this gear is non-negotiable. Remember: Rig it right, test it hard, and never assume it replaces attentiveness. Your partner’s life hangs in the balance (sometimes literally).
Now go climb smart—and maybe double-check that carabiner gate before you leave the ground.
Like a 2000s-era Nokia ringtone, reliability never goes out of style.