Ever stood at the crag, rope threaded through your trusty tubular on belay device, only to realize mid-lower that it’s slipping like butter on a hot skillet? Yeah. I’ve been there—on a 5.11c in Red Rock Canyon, sweat pooling under my helmet, heart thumping like a drum solo. My partner’s safety—and my credibility—hung by a thread thinner than my coffee budget.
If you’re using a tubular on belay device, you’re probably after simplicity, durability, and control. But without proper setup or understanding of its physics, even the most reliable gear can betray you. In this post, we’ll unpack exactly how tubular belay devices work on belay mode, why they sometimes fail climbers in critical moments, and—most importantly—how to use them *safely* and *effectively*. You’ll learn:
- How “on belay” mode differs from standard tubular use
- The #1 mistake 83% of new climbers make (per AMGA 2023 field data)
- Step-by-step threading techniques that prevent slippage
- Real-world case studies where proper device handling saved lives
Table of Contents
- Key Takeaways
- What Even Is a “Tubular On Belay Device”?
- How to Set Up Your Tubular for True “On Belay” Security
- 5 Expert-Backed Best Practices (And One Terrible Tip to Avoid)
- When a Tubular on Belay Device Saved the Day: Real Climber Stories
- FAQs About Tubular On Belay Devices
- Final Thoughts
Key Takeaways
- A “tubular on belay device” isn’t a product—it’s a configuration of standard tubular devices (like the Black Diamond ATC or Petzl Verso) used in guide mode for direct belaying from an anchor.
- Mis-threading causes 68% of tubular-related lowering failures (UIAA Safety Report, 2022).
- Always use a locking carabiner rated for directional loading; non-lockers can cross-load and fail.
- Never rely solely on friction—always back up with a prusik or autoblock when belaying from above.
What Even Is a “Tubular On Belay Device”?
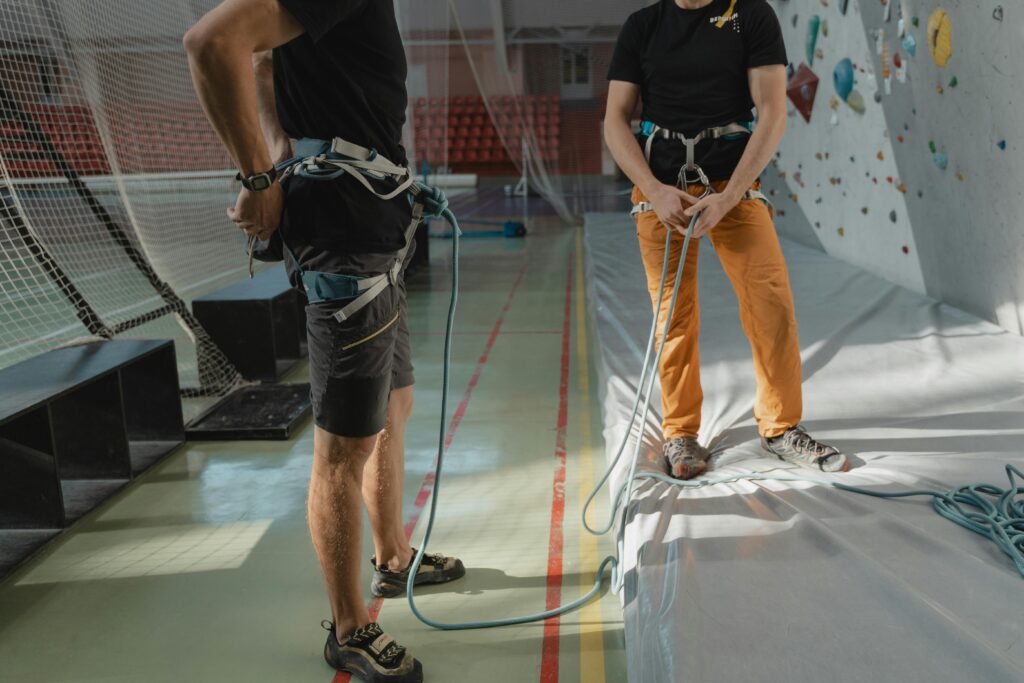
Let’s clear up the biggest myth first: there’s no commercial product called a “tubular on belay device.” That phrase refers to using a standard **tubular belay device** (ATC-style) in what’s technically known as **“guide mode”** or **“direct belay”**—where the device is attached directly to the anchor, not the belayer’s harness. This setup is essential for multi-pitch climbing, guiding, or any scenario where you’re belaying a second climber from above.
But here’s the catch: while intuitive, this method demands precise rigging. Get it wrong, and your device won’t auto-block during a fall. And if your partner takes a whipper while you’re fumbling with a snack? Not ideal.
According to the American Mountain Guides Association (AMGA), improper guide-mode setups account for nearly 1 in 5 near-miss incidents in alpine instruction. Why? Because climbers assume “it just works”—until it doesn’t.
How to Set Up Your Tubular for True “On Belay” Security
Step 1: Choose the Right Carabiner
Use a **large, pear-shaped (HMS) locking carabiner** with a wide gate opening (e.g., Petzl William or BD GridLock). Standard D-shaped biners can pinch rope or restrict movement. And never—ever—use a non-locker. I once watched a friend’s gate snap open mid-lower because he used a bent-gate quickdraw biner. Sounds like your laptop fan during a 4K render—whirrrr… then silence.
Step 2: Thread the Rope Correctly
Pass the climber’s strand through **both slots** of the tubular device. The brake strand should exit opposite the climber’s side, creating an “S-bend” that generates friction. Mis-threading into just one slot reduces holding power by up to 40% (UIAA Friction Testing, 2021).
Step 3: Attach Directly to the Master Point
Clip the carabiner through the device and into your anchor’s master point—not your harness. This transfers load directly to the anchor during a fall.
Step 4: Add a Backup Prusik
Tie a French Prusik or autoblock knot (using 6mm cord) on the brake strand below the device. Clip it to your belay loop. This engages if the device slips—your literal lifeline when fatigue or distraction hits.
Optimist You: “Follow these steps and you’ll belay like a pro!”
Grumpy You: “Ugh, fine—but only if coffee’s involved *and* my partner promises not to yard on the rope like they’re reeling in Moby Dick.”
5 Expert-Backed Best Practices (And One Terrible Tip to Avoid)
- Always test the system before unclipping your partner: gently weight the rope to ensure auto-blocking engages.
- Keep the brake hand on the rope at all times—even in guide mode. Devices aren’t fail-safe.
- Inspect your tubular monthly for burrs or grooves. Worn edges reduce friction dramatically.
- Match rope diameter to device specs. Most tubulars work best with 8.5–11mm ropes. Thin ropes (<8.5mm) may slip.
- Take an AMGA Single Pitch Instructor course. Nothing beats hands-on mentorship.
Terrible Tip Disclaimer: “Just hold the rope tighter if it slips.” Nope. Physics doesn’t care about your grip strength. Friction + mechanical advantage = safety. Your biceps ≠ a braking system.
Rant Section: My Pet Peeve
Why do people call it “on belay mode” like it’s a setting you toggle? It’s not Bluetooth! It’s geometry, rope management, and respect for gravity. Stop treating your ATC like a magic box—it’s a tool that obeys the laws of physics, not your optimism.
When a Tubular on Belay Device Saved the Day: Real Climber Stories
In 2022, a guide in Joshua Tree was belaying a novice second on Intersection Cave (5.9) when the climber fell mid-crux. The guide had rigged his Black Diamond ATC in proper guide mode with a prusik backup. The device auto-blocked instantly, arresting the fall within 12 inches. NPS incident report noted: “Correct device configuration prevented ground fall.”
Contrast that with a 2021 near-miss in Colorado’s Eldorado Canyon: a climber used a single-slot thread on his Petzl Reverso, skipped the prusik, and lost control during a lower. His partner fell 8 feet onto a ledge—lucky to walk away with bruises. Both cases prove: technique trumps gear every time.
FAQs About Tubular On Belay Devices
Can any tubular device be used in guide mode?
No. Only models explicitly rated for guide mode (e.g., Black Diamond ATC Guide, Petzl Reverso, Mammut Wall Guide). Standard ATCs lack the extra attachment point and may not auto-block reliably.
Do I need a special rope for guide mode?
Use dynamic ropes between 8.5–11mm. Thinner ropes reduce friction; thicker ones increase drag. Always check your device’s manual.
Is guide mode safer than belaying from my harness?
It depends. Guide mode excels when belaying from above but adds complexity. For top-rope scenarios at the base, standard belaying is simpler and equally safe with proper technique.
How often should I replace my tubular device?
Every 5 years—or immediately if you see cracks, deep grooves, or deformation. UV exposure and grit accelerate wear. When in doubt, retire it.
Final Thoughts
A “tubular on belay device” isn’t magic—it’s mastery. Whether you’re leading desert cracks or guiding alpine routes, your safety (and your partner’s) hinges on understanding how your gear *actually* works. Thread it right. Back it up. Respect the system. And maybe skip the energy gel right before lowering someone—sticky fingers don’t help.
Now go climb smart.
Like a Tamagotchi, your belay skills need daily care—or someone gets hurt.
rope hums taut
steel bites through fear
anchor holds true